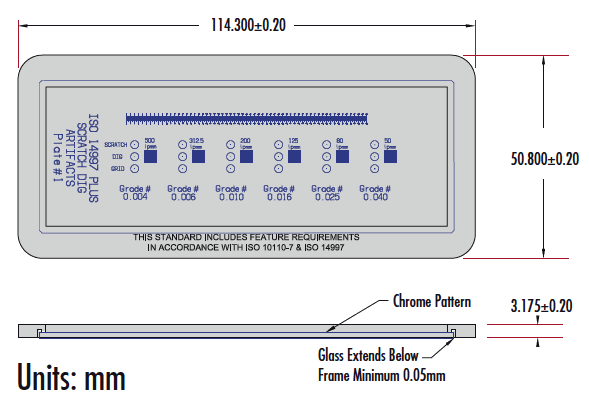
NIST Traceable Scratch Dig Standards are ideal for qualifying the scratch and dig surface defects on optical components. In addition to the Scratch Dig markings, there is a 60mm scale, 6 grids varying in size, and 6 blocks of lines with varying frequencies on each plate. The grids can be used to measure the area of irregularly shaped defects. For the NIST Traceable Scratch Dig Standards, the square root of the total defect area for a region is the grade number for that region. The standards are offered as sets of two plates. Plate 1 includes grade numbers ranging from 0.004 to 0.040, while Plate 2 includes 0.040 to 0.400. The first surface sets have the features marked on the top of the glass substrate. The second surface set has the features marked on the bottom of the glass substrate. The features on the positive set are opaque on a clear background. The features on the negative set are clear on an opaque background.
Note: Certificate of Compliance is included with each product.

| Plate 1 | |||||
| Grade No. | Circ. Diameter (μm) | Dim. of Scratch (μm) | Freq. Block (lp/mm) | Grid Block Line W (μm) | Grid Block Line Spacing (μm) |
| 0.004 | 4.5 | 1 x 16 | 500 | 1 | 4.5 |
| 0.006 | 7 | 1.6 x 25 | 312.5 | 1.6 | 7 |
| 0.010 | 11 | 2.5 x 40 | 200 | 2.5 | 11 |
| 0.016 | 18 | 4 x 63 | 125 | 4 | 18 |
| 0.025 | 28 | 6.3 x 100 | 80 | 6.3 | 28 |
| 0.040 | 45 | 10 x 160 | 50 | 10 | 45 |
| Plate 2 | |||||
| Grade No. | Circ. Diameter (μm) | Dim. of Scratch (μm) | Freq. Block (lp/mm) | Grid Block Line W (μm) | Grid Block Line Spacing (μm) |
| 0.040 | 45 | 10 x 160 | 50 | 10 | 45 |
| 0.060 | 70 | 16 x 225 | 31.25 | 10 | 70 |
| 0.100 | 110 | 25 x 400 | 20 | 10 | 110 |
| 0.160 | 180 | 40 x 630 | 12.5 | 10 | 180 |
| 0.250 | 280 | 63 x 1000 | 8 | 10 | 280 |
| 0.400 | 450 | 100 x 1600 | 5 | 10 | 450 |
or view regional numbers
QUOTE TOOL
enter stock numbers to begin
Copyright 2024, Edmund Optics Singapore Pte. Ltd, 18 Woodlands Loop #04-00, Singapore 738100
California Consumer Privacy Acts (CCPA): Do Not Sell or Share My Personal Information
California Transparency in Supply Chains Act
The FUTURE Depends On Optics®